Centos 7:1
vi /usr/lib/systemd/system/ngrokConfEditor.service
1 | [Unit] |
1 | systemctl enable ngrokConfEditor.service |
Raspbian:1
vi /etc/init.d/ngrokconfeditor
1 | #!/bin/sh |
1 | update-rc.d ngrokconfeditor defaults |
Centos 7:1
vi /usr/lib/systemd/system/ngrokConfEditor.service
1 | [Unit] |
1 | systemctl enable ngrokConfEditor.service |
Raspbian:1
vi /etc/init.d/ngrokconfeditor
1 | #!/bin/sh |
1 | update-rc.d ngrokconfeditor defaults |
之前有的朋友问我,CentOS版本怎么安装python的pip,我之前给出的Ubuntu下apt-get的方法
ubuntu 需要先安装下pip吧,1
apt-get install python-pip
安装requests1
pip install requests
但是有的朋友由于是centos的,直接 yum install pip 或者 yum install python-pip 都是不行的。
其实不能yum那就直接下载编译安装呗。。。
方法如下:
截至写本文的时候,pip最新为 8.1.11
wget --no-check-certificate https://github.com/pypa/pip/archive/8.1.1.tar.gz
注意:wget获取https的时候要加上:–no-check-certificate
1 | tar zvxf 8.1.1.tar.gz #解压文件 |
OK,这样就安装好pip了,
下面来安装 requests吧。1
pip install requests
本文所在环境:
PC:Ubuntu 15.10 live
Pi2:Centos 7.2,已将 Boot 分离(可参考教程 将树莓派系统迁移至 U 盘上)
第一步,压缩系统分区
打开 GParted
切换至你的设备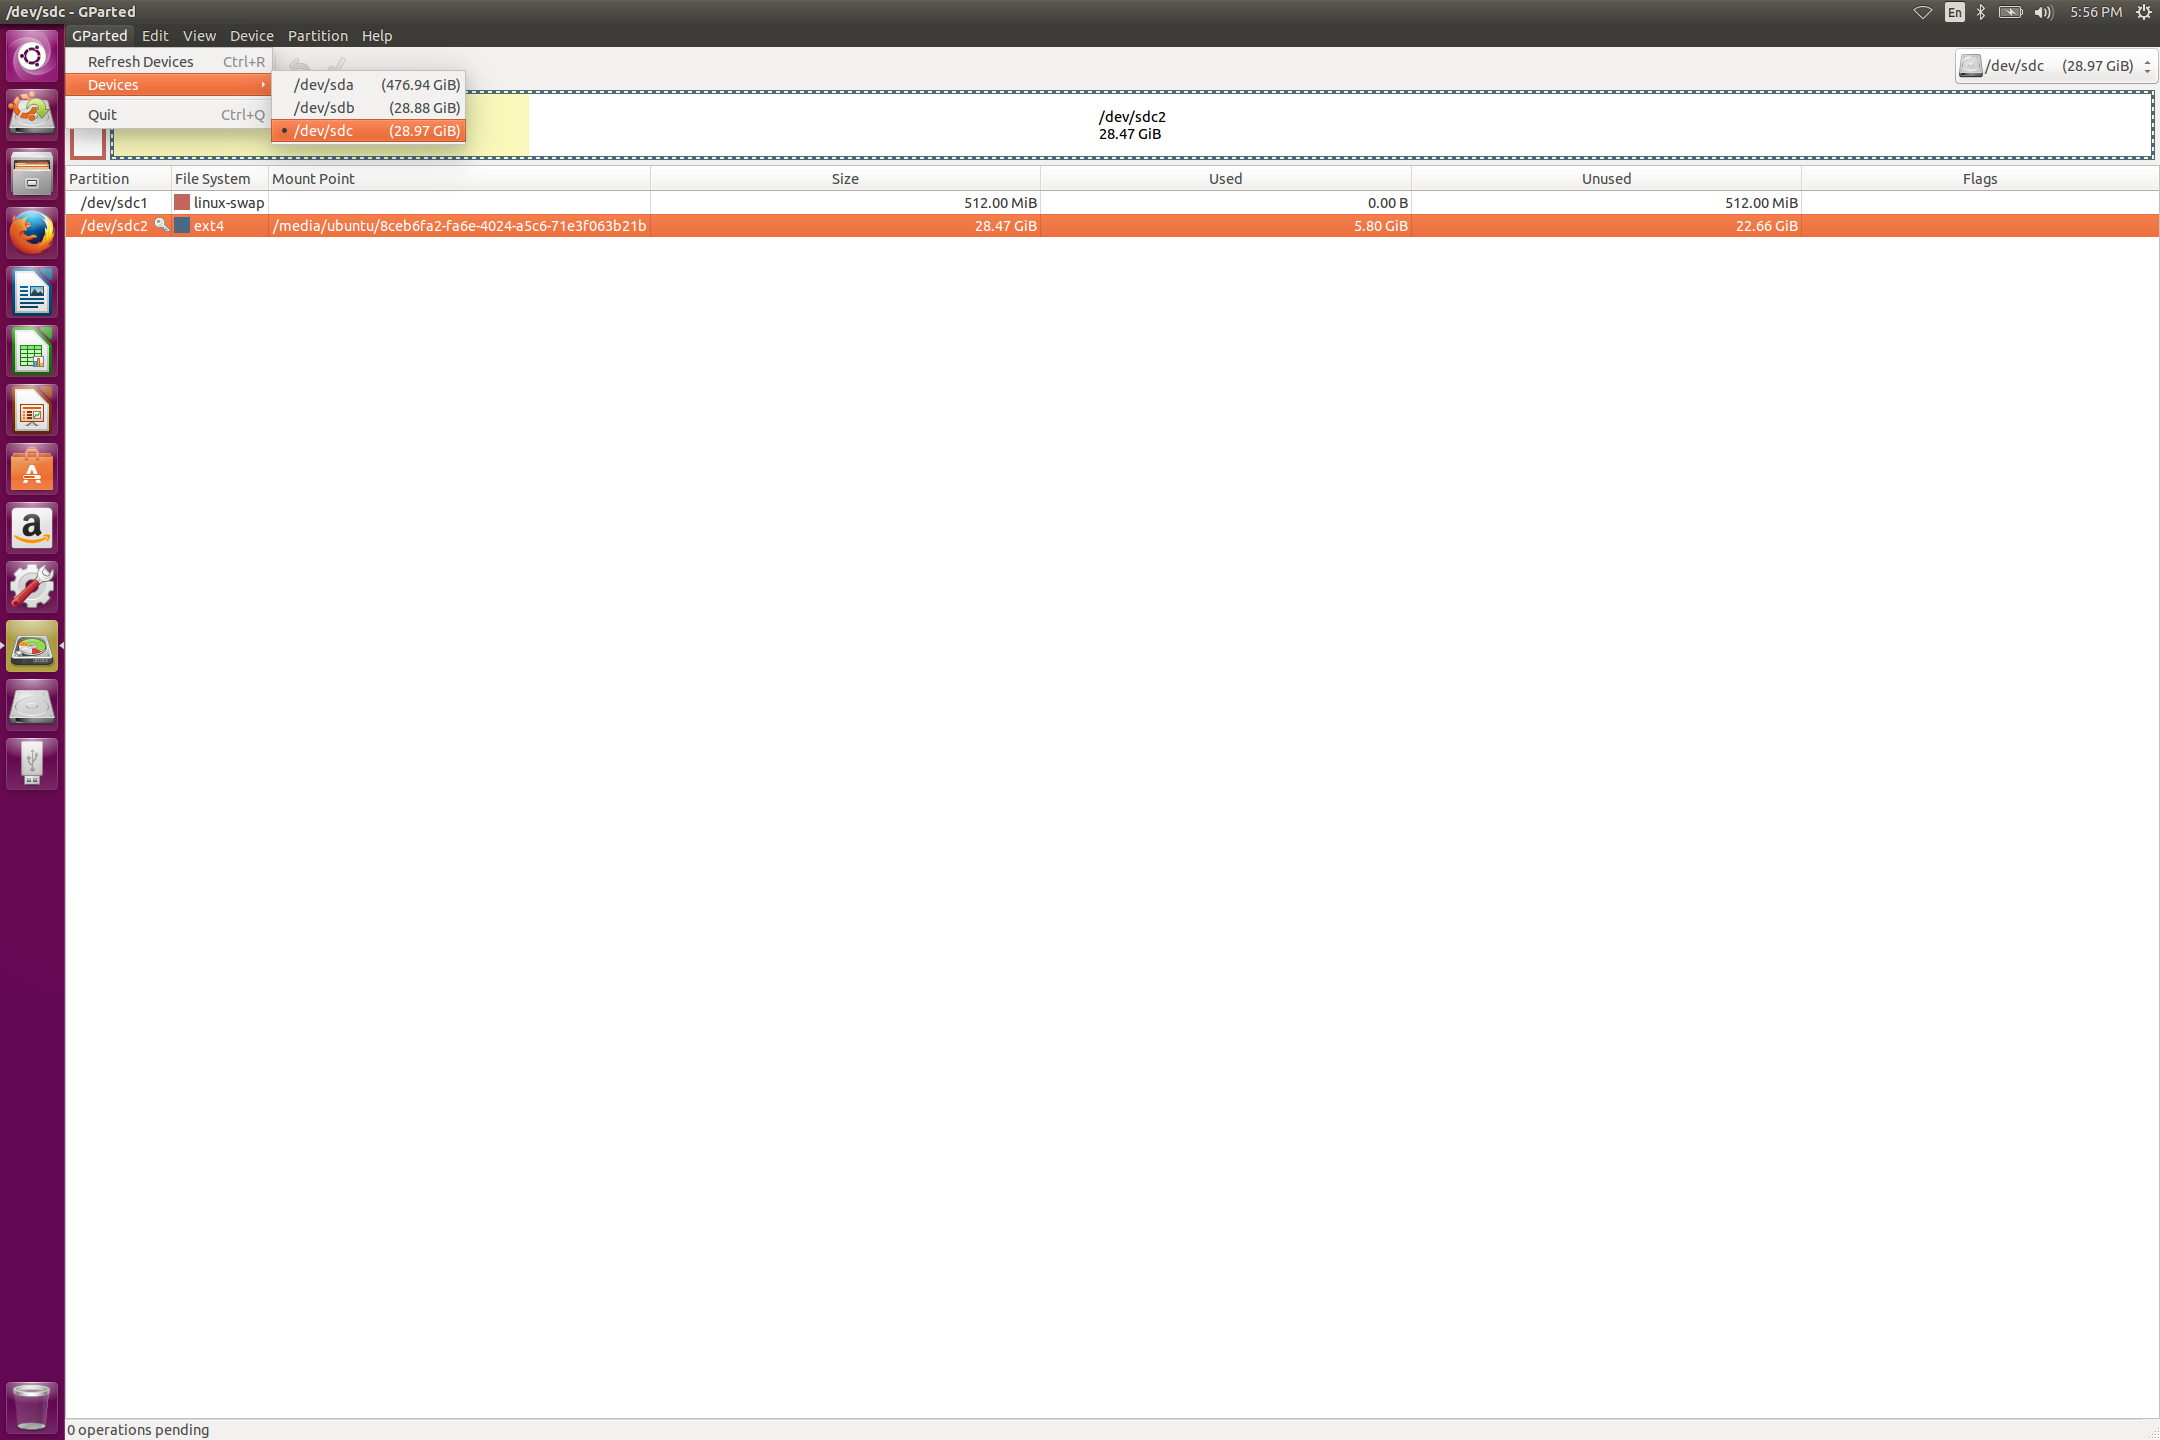
卸载设备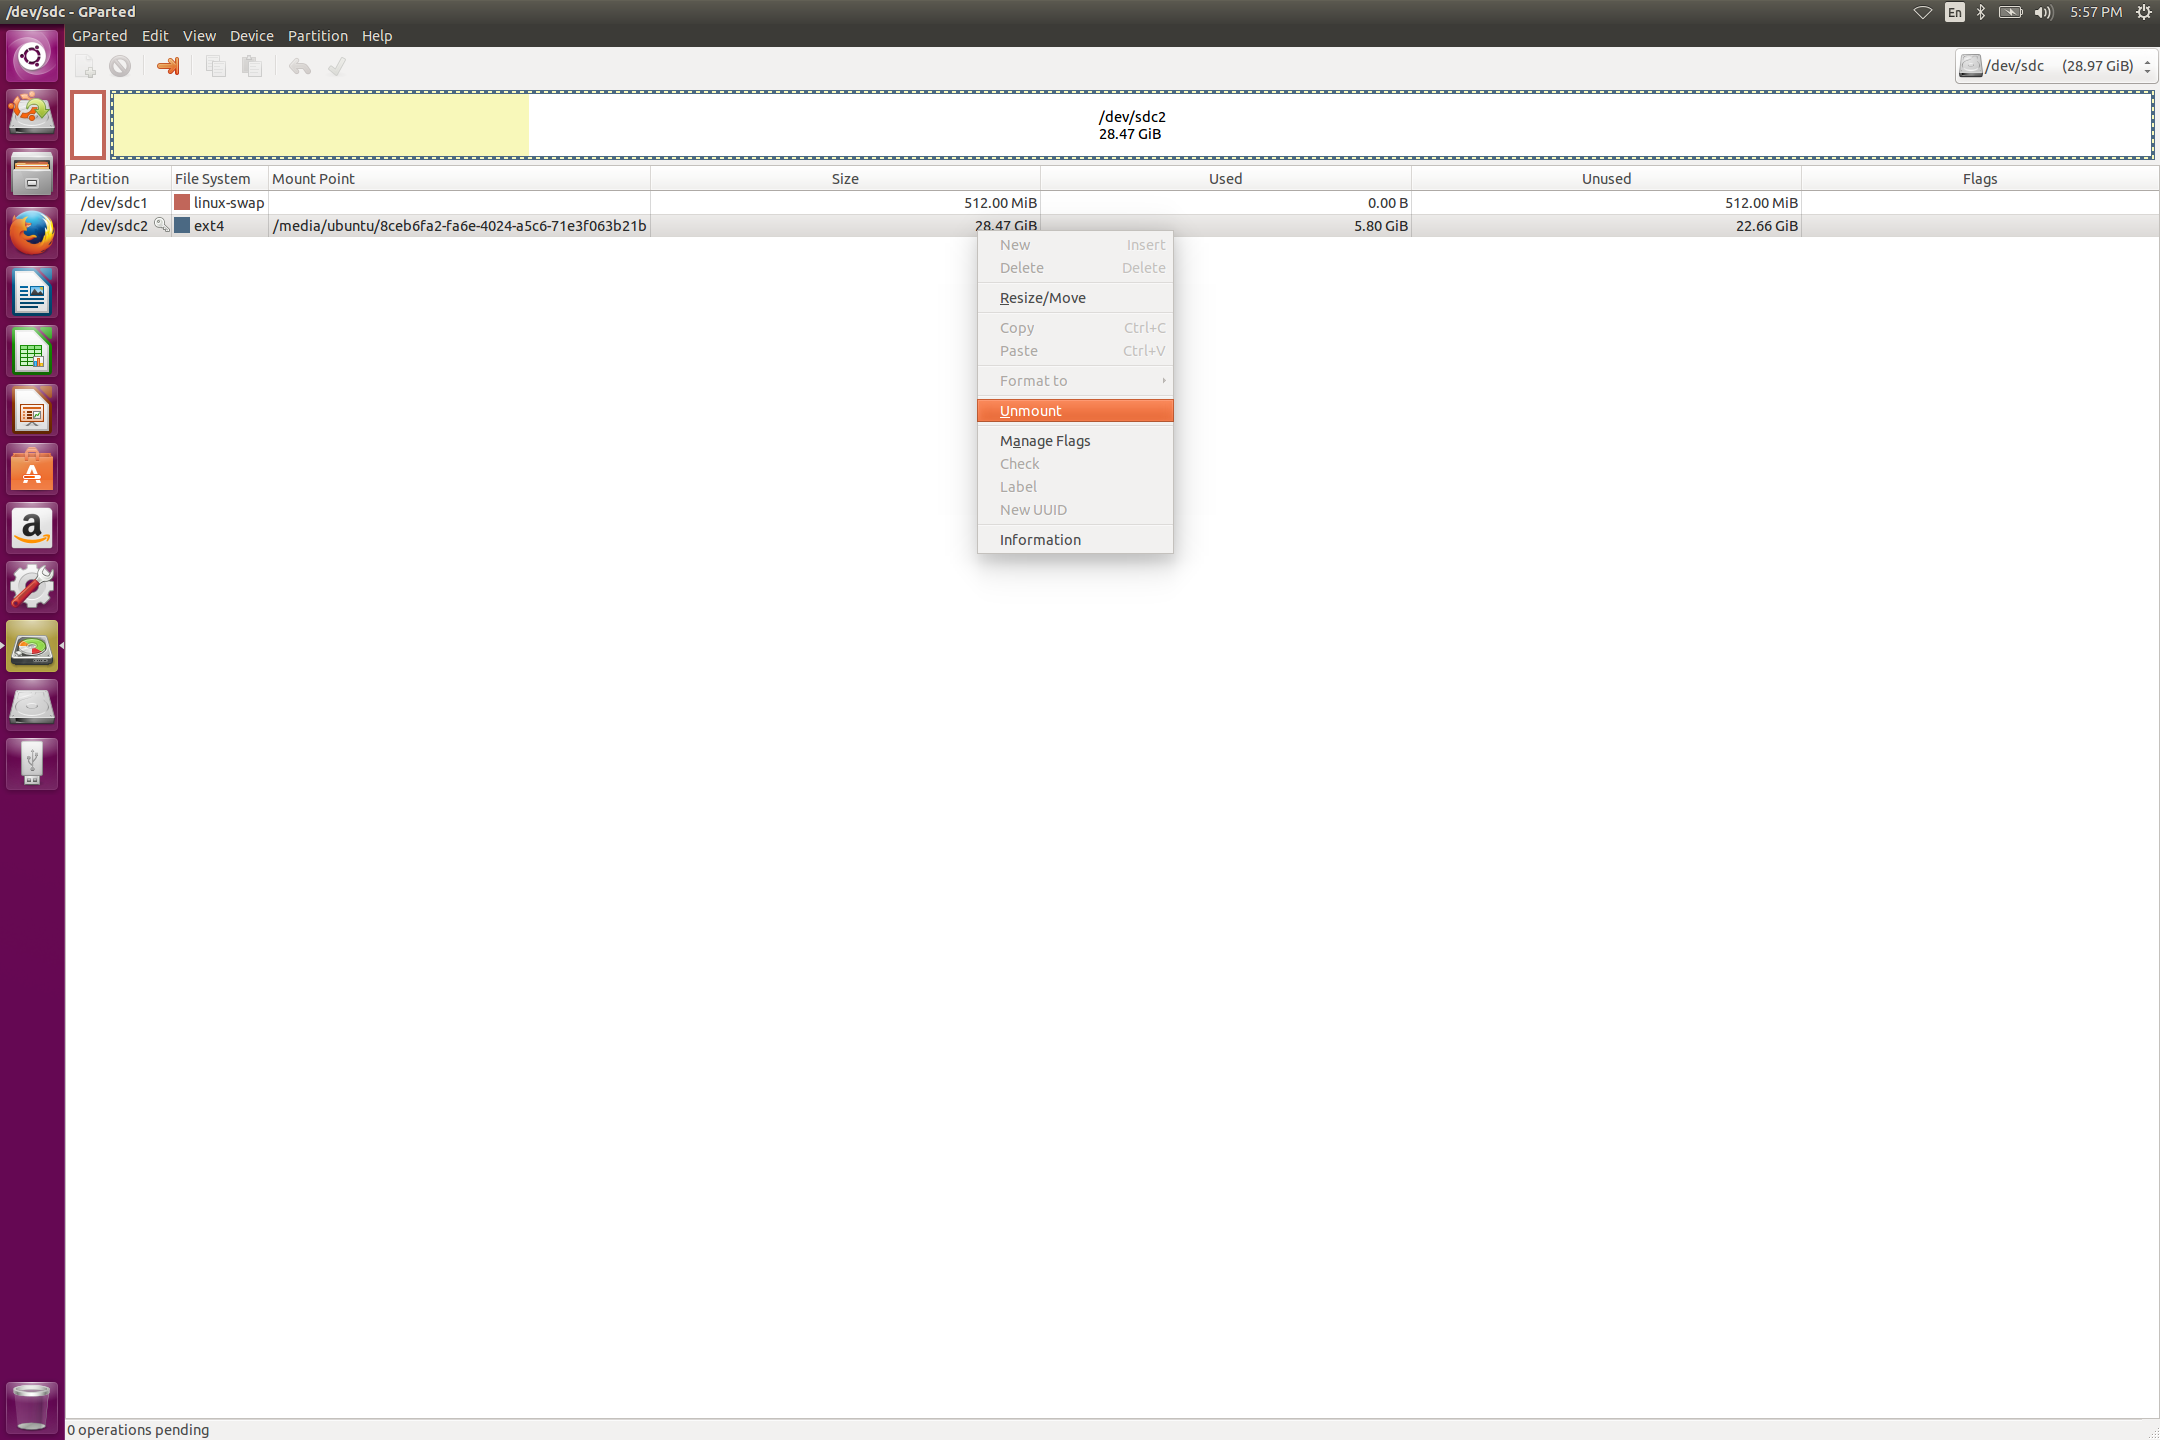
按需压缩
有个警告提示,Apply 即可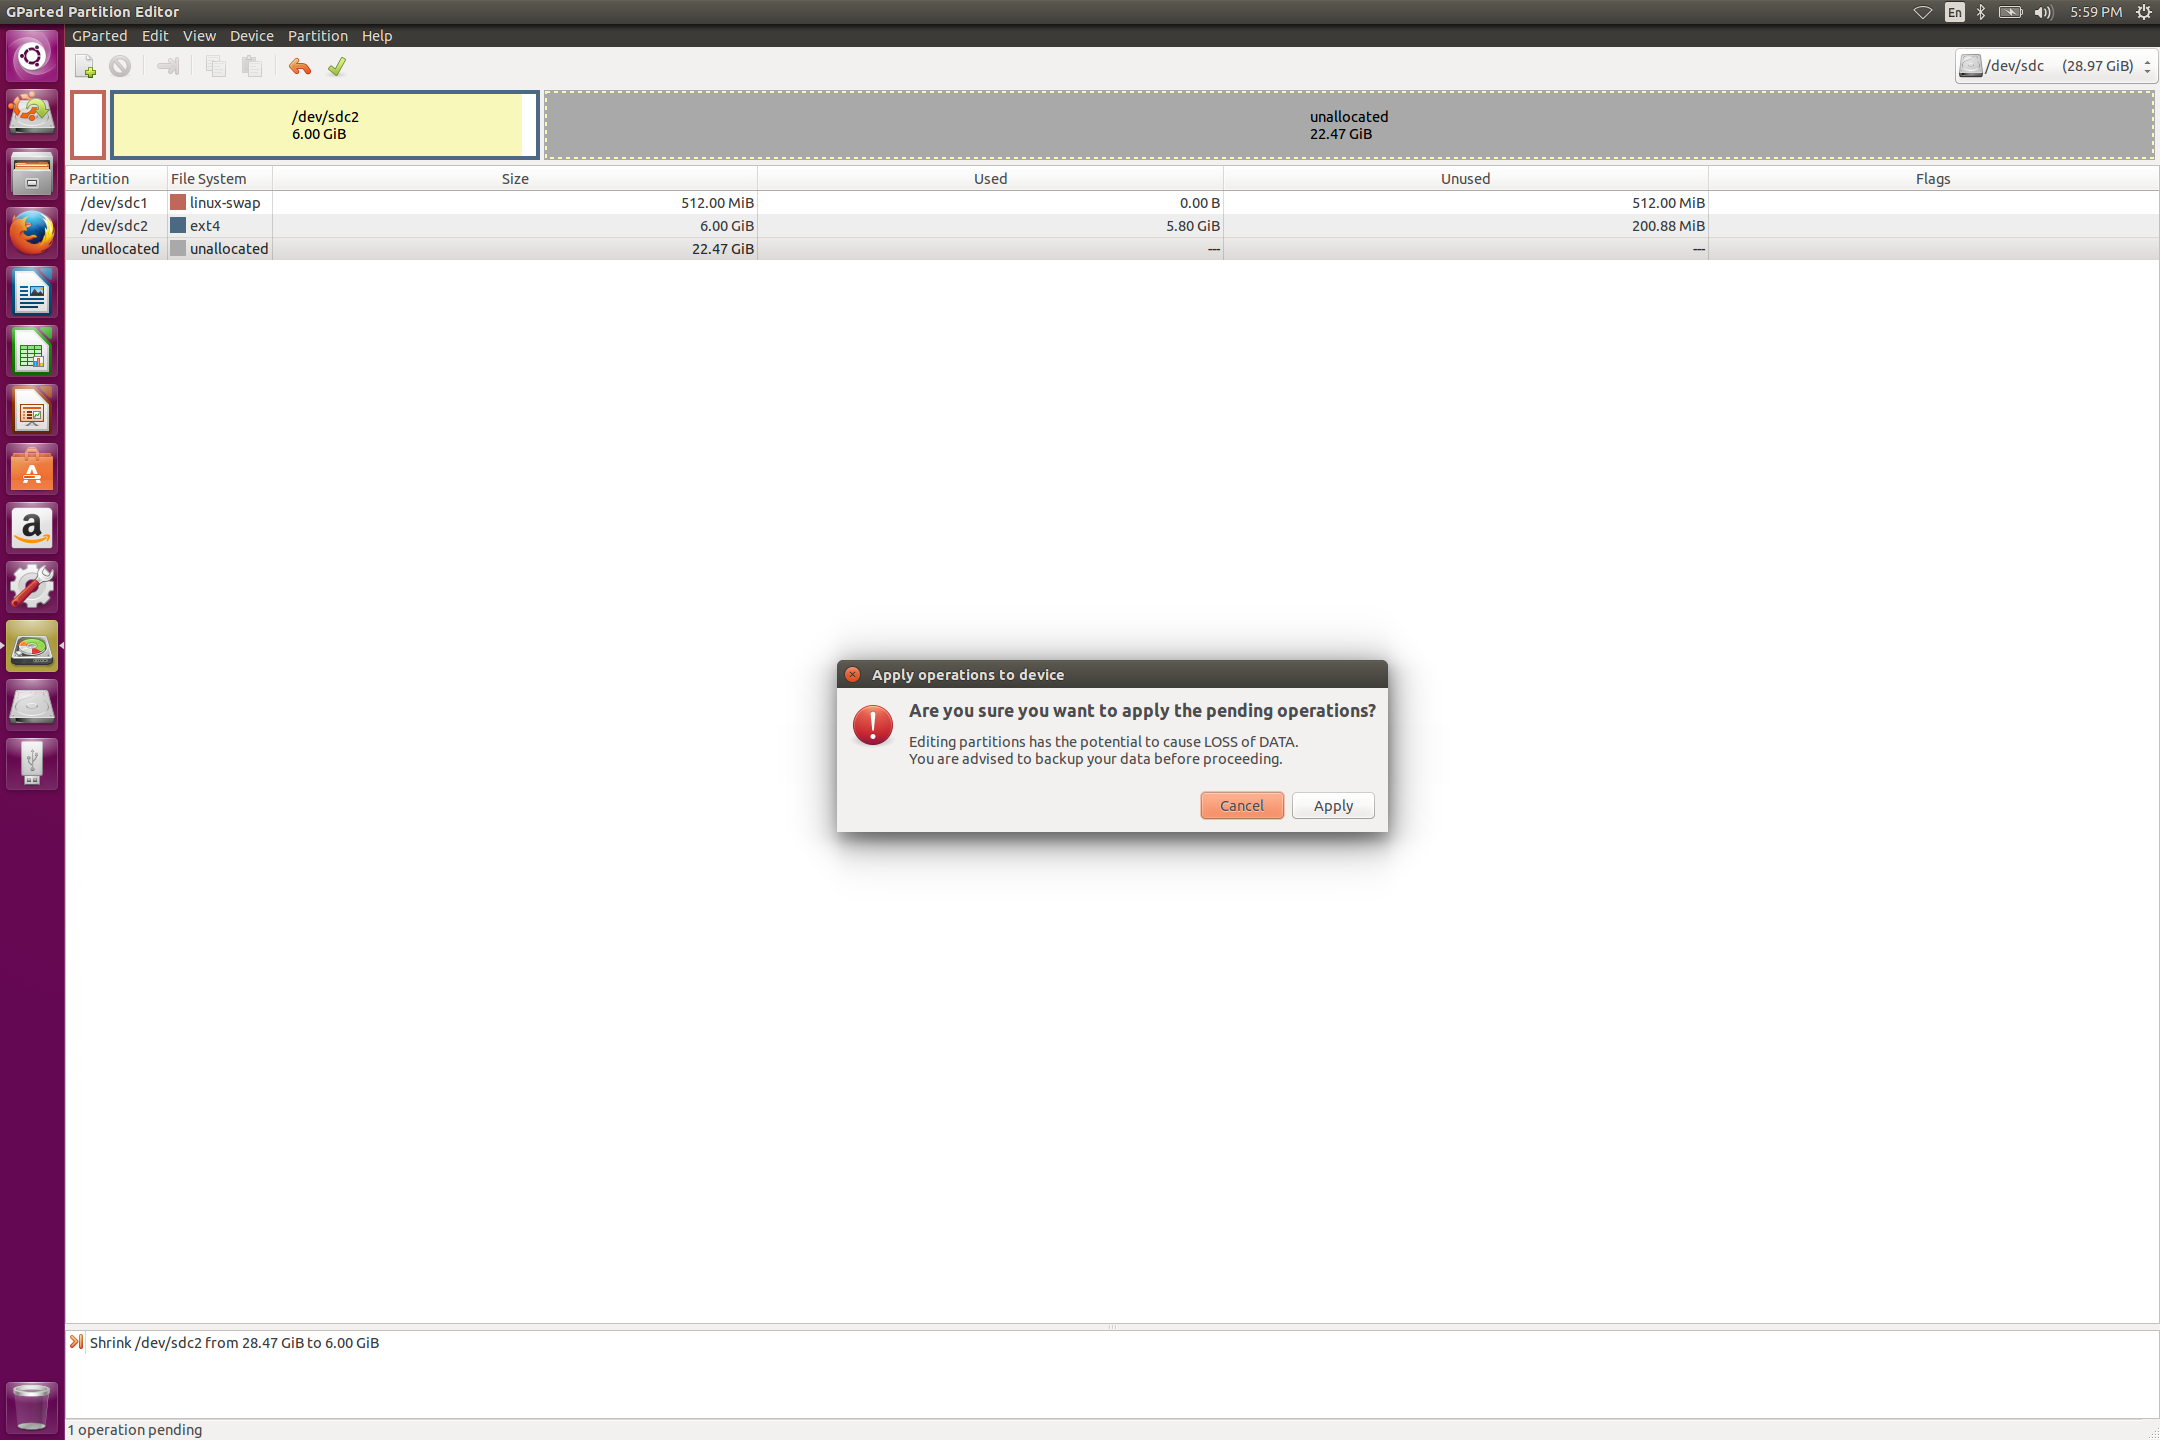
等待操作完成即可进行下一步操作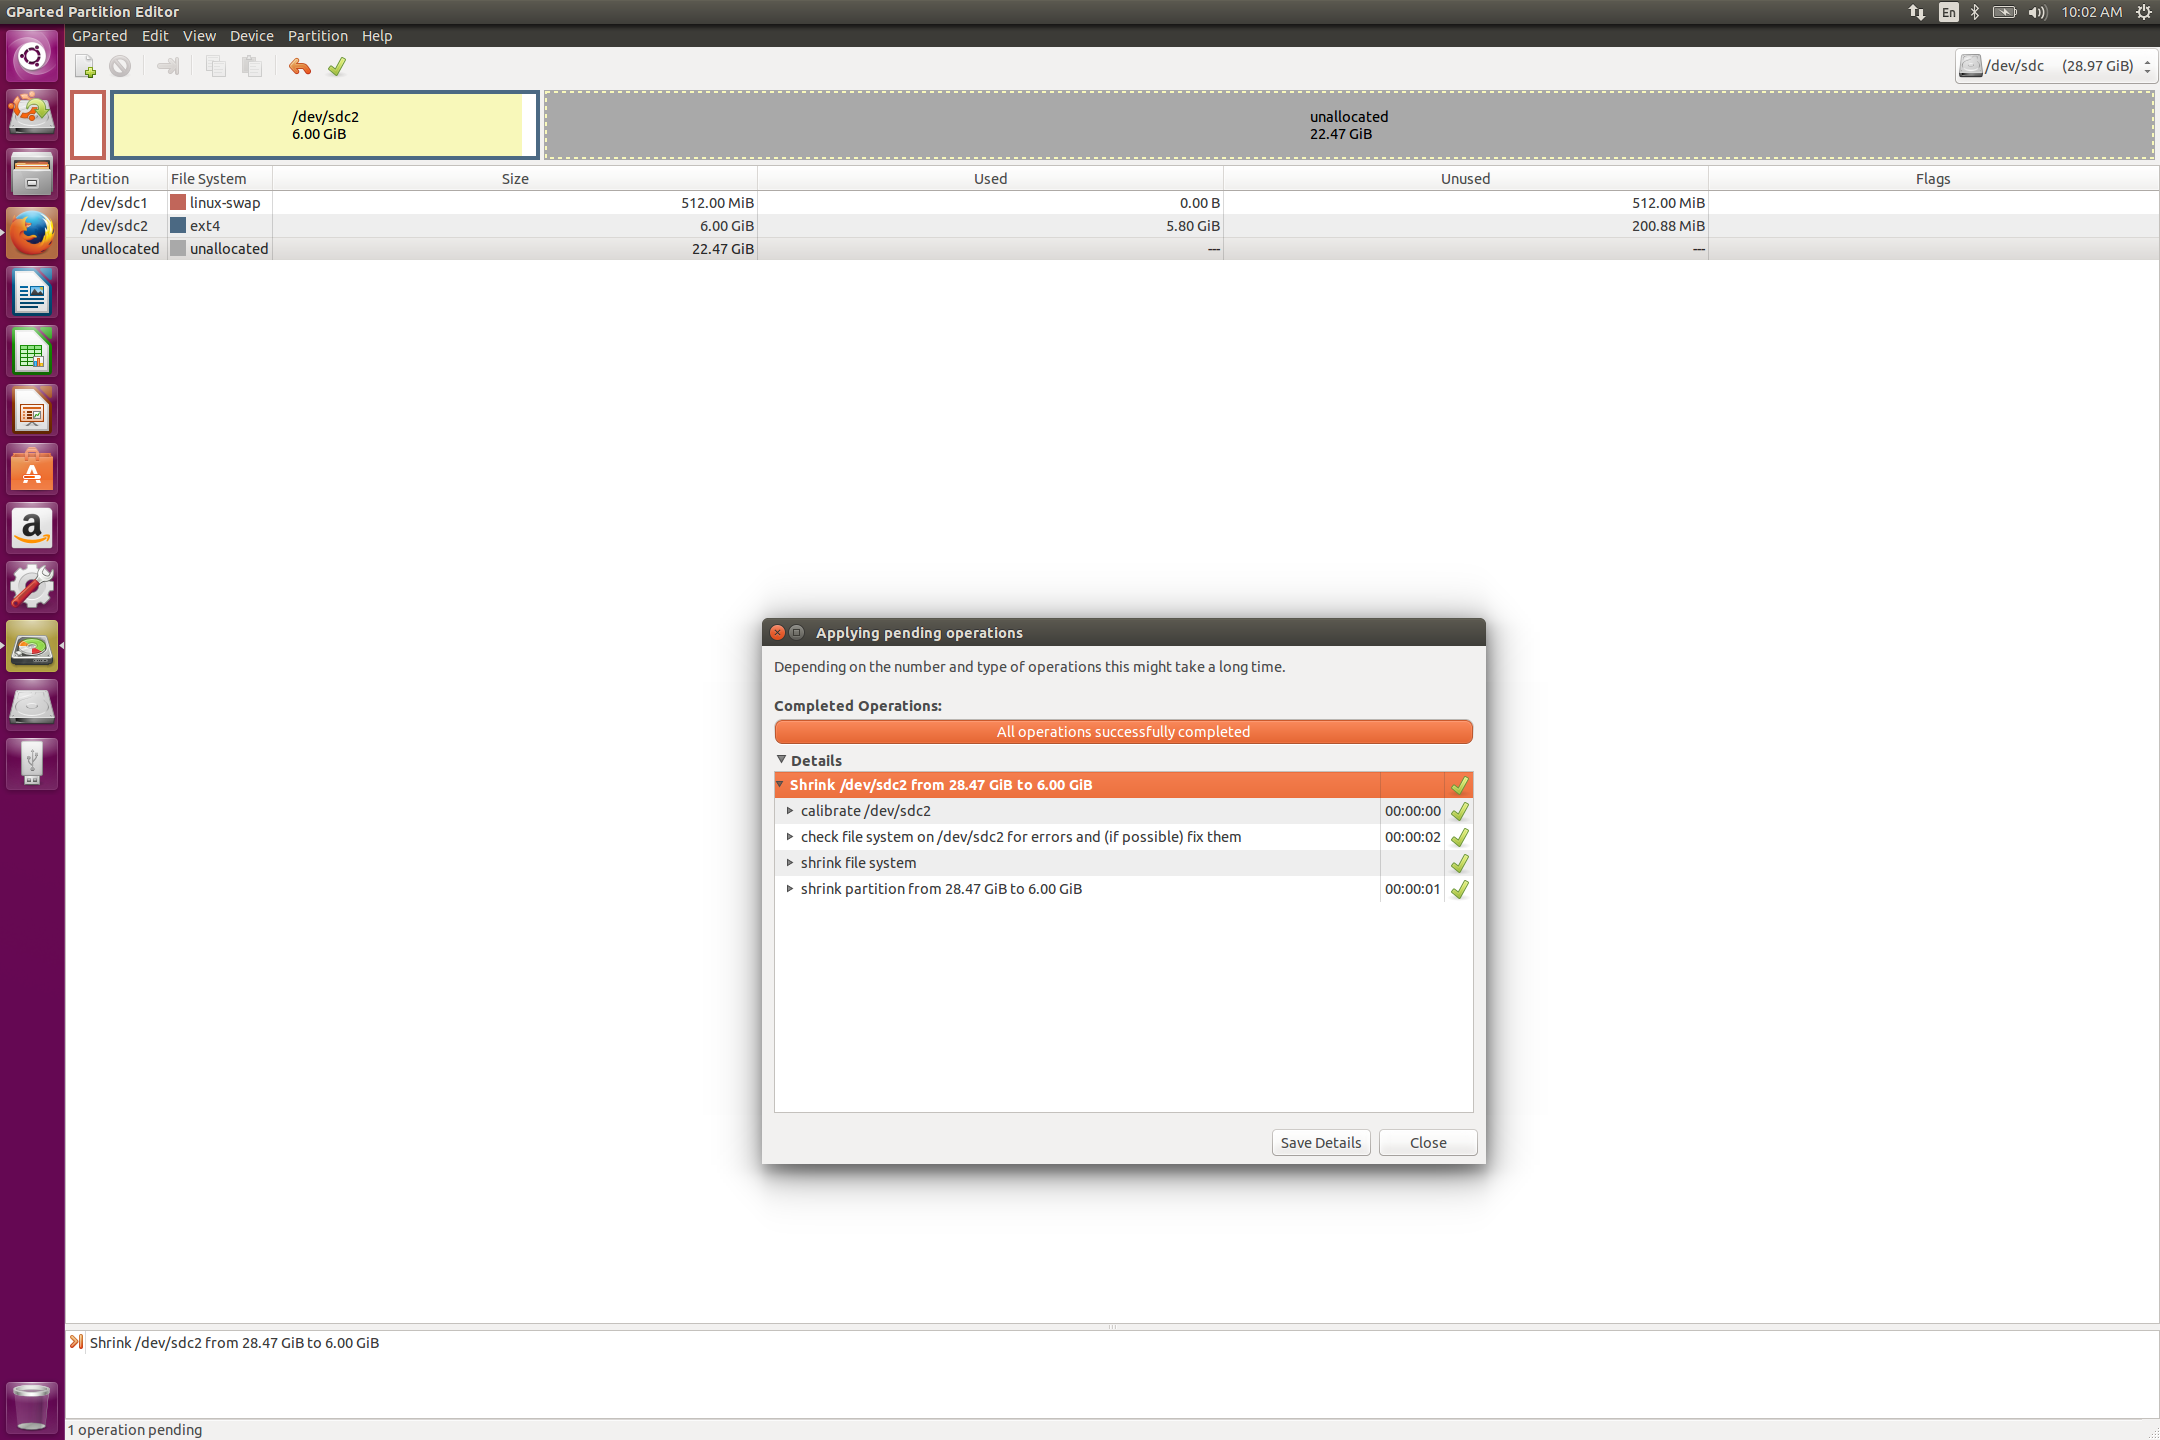
第二步,导出全盘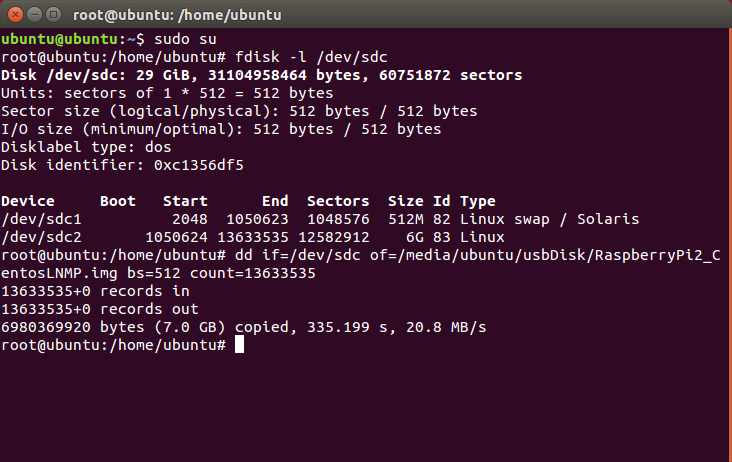
注:
第三步,还原分区(可选)
按第一步操作,还原分区大小
还原备份文件1
dd if=/YourPath/img.img of=/dev/YourDevice
即第二步中的 if of 参数对换并去掉其他的无用参数
我的树莓派接在局域网中,如果在外网对其进行访问,以前只能选择花生壳,而现在则有了开源方案 Ngrok。Ngrok 可以选择用官网的服务,不过很可惜的是被墙了,如果不怕麻烦,也可以翻墙使用,我们这里选择自建 Ngrok 服务。Ngrok 分为服务端和客户端,服务端需安装在有独立 IP 的外网中,我用的是 Ramnode KVM VPS,客户端安装在处于内网的树莓派中。
编译服务端、客户端
下载 golang,准备编译环境:
1 | wget http://www.golangtc.com/static/go/1.6/go1.6.linux-amd64.tar.gz |
下载 ngrok
1 | git clone https://github.com/inconshreveable/ngrok.git |
生成自签名 SSL 证书,example.com 替换为自己的域名:
1 | openssl genrsa -out base.key 2048 |
将原始的 ngrokroot.crt 替换为生成的 pem 文件:
1 | cp base.pem assets/client/tls/ngrokroot.crt |
编译 Ngrok 服务端:
1 | GOOS=linux GOARCH=amd64 make release-server |
编译 Ngrok 客户端:
1 | GOOS=linux GOARCH=arm make release-client |
将服务端和客户端分别拷贝到 VPS 和树莓派的可执行路径下。
设置域名解析
把域名 example.com 解析到 VPS 上,假如只需要一个二级域名 abc,可直接设置将其 A 记录解析到 VPS 的 IP 上,如果需要很多二级域名,可以直接把 * 解析到 IP 上。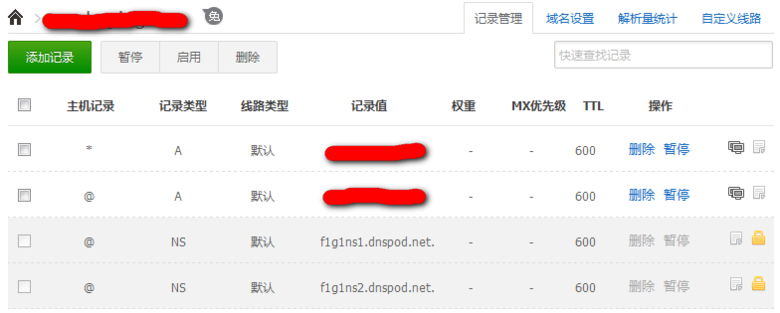
服务端启动
从命令行启动:
1 | ./bin/ngrokd -tlsKey=server.key -tlsCrt=server.crt -domain=example.com -httpAddr=:8080 -httpsAddr=:8081 |
设置为开机自动启动:
1 | vim /etc/init.d/ngrokd |
1 | !/bin/sh |
1 | update-rc.d ngrokd defaults |
客户端启动
对默认设置文件 /root/ngrok.cfg 进行编辑:
1 | server_addr: example.com:4443 |
从命令行启动:
1 | ./bin/ngrok start ngrok ssh |
当客户端使用 http/https 协议连接,可指定一个二级域名,服务端会分配该二级域名给客户端作为入口,比如 web.example.com; 当客户端使用 tcp 协议连接,则服务端不会分配二级域名,改为监控一个随机端口,比如 example.com:12345,remote_port 可由客户端对该端口进行指定,比如 example.com:34356。
客户端和服务端建立连接后,访问 web.example.com:8080 可以穿透内网访问树莓派的 web 服务,执行 ssh -p34356 pi@example.com 可以穿透内网登陆树莓派的 ssh 服务。
设置为开机自动启动(使用了面板的同学请不要设置!!!):
1 | vim /etc/init.d/ngrok |
1 | !/bin/sh |
1 | update-rc.d ngrok defaults |
参考
网上许多教程都有部分遗漏,被坑惨的我查了官方教程(http://expressjs.com/en/4x/api.html#req.body),写篇文章做个笔记
后端:1
2
3
4
5
6
7
8
9
10
11
12var express = require('express');
var app = express();
var http = require('http').Server(app);
var bodyParser = require('body-parser');
var multer = require('multer');
var upload = multer();
app.post('/getJSON', upload.array(), function(req, res) {
res.send(JSON.stringify(req.body) || "");
});
前端:1
2
3
4
5
6
7
8
9
10$.ajax({
type: 'post',
url: '/getJSON',
dataType: 'json',
timeout: 5000,
data: $("#dataForm").serialize(),
success: function(re) {
console.log(re);
}
});
记得之前刚搭建起来ngrok时当时很兴奋觉得很舒服,但是很快产生了一个问题,ngrok占用80和443的话,那nginx该怎么办呢,虽然想过ngrok监听别的端口,但是一些程序却必须使用80和443,然后当时就想到了反代,但是泛域名反代而且端口不同,如何正确处理主机头成了问题,反代一个域名可以将主机头写成固定的,但是泛域名则是不确定主机头的,网上查了许久资料均未找到答案,后来不报希望的试了下,竟然成功了,今日想起来这件事情,便写博文记录下来。
下,竟然成功了,今日想起来这件事情,便写博文记录下来。
涉及到的配置文件
nginx的nginx.conf1
2
3
4
5
6
7
8
9
10
11
12
13
14
15
16
17
18
19user nginx;
#上面用户可根据情况换成root(不推荐)
worker_processes 1;
error_log /var/log/nginx/error.log warn;
pid /var/run/nginx.pid;
events {
worker_connections 1024;
}
http {
include /etc/nginx/mime.types;
default_type application/octet-stream;
log_format main '$remote_addr - $remote_user [$time_local] "$request" '
'$status $body_bytes_sent "$http_referer" '
'"$http_user_agent" "$http_x_forwarded_for"';
access_log /var/log/nginx/access.log main;
sendfile on;
keepalive_timeout 65;
include /etc/nginx/conf.d/*.conf;
}
ngrok反向代理文件(主要!)1
2
3
4
5
6
7
8
9
10
11
12
13
14
15
16
17
18
19
20
21
22
23
24
25
26
27
28
29
30
31
32
33
34
35
36
37
38
39
40
41
42
43
44
45
46
47server {
listen 80;
server_name *.0n0.win;
root html;
index index.html index.htm index.php;
location / {
proxy_pass http://127.0.0.1:81;
proxy_redirect off;
proxy_set_header Host $host:81;
proxy_set_header X-Real-IP $remote_addr;
proxy_set_header X-Forwarded-For $proxy_add_x_forwarded_for;
proxy_next_upstream error timeout invalid_header http_500 http_502 http_503 http_504;
proxy_max_temp_file_size 0;
proxy_connect_timeout 90;
proxy_send_timeout 90;
proxy_read_timeout 90;
proxy_buffer_size 4k;
proxy_buffers 4 32k;
proxy_busy_buffers_size 64k;
proxy_temp_file_write_size 64k;
}
}
server {
listen 443;
server_name *.0n0.win;
ssl on;
ssl_certificate /root/ngrok/rootCA.pem;
ssl_certificate_key /root/ngrok/rootCA.key;
root html;
index index.html index.htm index.php;
location / {
proxy_pass https://127.0.0.1:444;
proxy_redirect off;
proxy_set_header Host $host:444;
proxy_set_header X-Real-IP $remote_addr;
proxy_set_header X-Forwarded-For $proxy_add_x_forwarded_for;
proxy_next_upstream error timeout invalid_header http_500 http_502 http_503 http_504;
proxy_max_temp_file_size 0;
proxy_connect_timeout 90;
proxy_send_timeout 90;
proxy_read_timeout 90;
proxy_buffer_size 4k;
proxy_buffers 4 32k;
proxy_busy_buffers_size 64k;
proxy_temp_file_write_size 64k;
}
}
我的nginx包含的模块
那两个模块可根据自己需要自行删除或添加1
./configure --prefix=/etc/nginx --sbin-path=/usr/sbin/nginx --conf-path=/etc/nginx/nginx.conf --error-log-path=/var/log/nginx/error.log --http-log-path=/var/log/nginx/access.log --pid-path=/var/run/nginx.pid --lock-path=/var/run/nginx.lock --http-client-body-temp-path=/var/cache/nginx/client_temp --http-proxy-temp-path=/var/cache/nginx/proxy_temp --http-fastcgi-temp-path=/var/cache/nginx/fastcgi_temp --http-uwsgi-temp-path=/var/cache/nginx/uwsgi_temp --http-scgi-temp-path=/var/cache/nginx/scgi_temp --user=nginx --group=nginx --with-http_ssl_module --with-http_realip_module --with-http_addition_module --with-http_sub_module --with-http_dav_module --with-http_flv_module --with-http_mp4_module --with-http_gunzip_module --with-http_gzip_static_module --with-http_random_index_module --with-http_secure_link_module --with-http_stub_status_module --with-http_auth_request_module --with-mail --with-mail_ssl_module --with-ipv6 --with-http_spdy_module --add-module=/root/mk/ngx_http_substitutions_filter_module --add-module=/root/mk/headers-more-nginx-module
两个模块的git
两个都是反代时替换内容用到的1
2
3mkdir /root/mk &&cd /root/mk
git clone https://github.com/openresty/headers-more-nginx-module.git
git clone https://github.com/yaoweibin/ngx_http_substitutions_filter_module.git
1 | DROP PROCEDURE IF EXISTS pro_test; |
1 | -- 启动事务 |
1 | insert into test_user values(NULL,1,'啊是大三的'); |
1 | $name = '成都市'; |
1 | print_r($outputArray["@sp_result"]); |
转载自:http://blog.csdn.net/auspi12341/article/details/17167069
系统 Ubuntu 14.04.4 LTS x64,阿里云
说来也是一个很诡异的案例,使用 lnmp 1.2(http://lnmp.org)搭建的环境,安装过程中就一直出错,好不容易编译上去了,却死活无法启动,当然最终还是解决了,写篇文章供日后参考。
1. 编译过程报错 Inconsistency detected by ld.so
原文:1
2Inconsistency detected by ld.so: dl-version.c: 224: _dl_check_map_versions: Assertion `needed != ((void *)0)' failed!
make: *** No targets specified and no makefile found. Stop.
百度半天无果,必应了下找到答案:http://bbs.vpser.net/viewthread.php?action=printable&tid;=126361
2
3
4
5
6
7mv /usr/bin/cmake /usr/bin/cmake.backup
wget http://www.cmake.org/files/v3.0/cmake-3.0.2.tar.gz
tar zxf cmake-3.0.2.tar.gz
cd cmake-3.0.2
./configure
make && make install
ln -sf /usr/local/bin/cmake /usr/bin/cmake
2. 编译过程再报错 cc: internal compiler error: Killed1
2
3
4cc: internal compiler error: Killed (program cc1)
Please submit a full bug report,
with preprocessed source if appropriate.
See <http://bugzilla.redhat.com/bugzilla> for instructions.
参考 http://bbs.vpser.net/viewthread.php?tid=11757,内存不足,添加 swap 解决问题
3. 启动报错 Can’t read from messagefile ‘/usr/share/mysql/errmsg.sys’
导致这个问题产生的原因挺多的。。搜到几个挺有用的结果,但尼玛不是我的问题。
从这里找到的灵感:http://bugs.mysql.com/bug.php?id=69677
默认配置文件路径 /etc/mysql/my.cnf
lnmp 的在 /etc/my.cnf
不知道为什么 mysql_install_db 没有把默认配置文件的路径正常初始化,导致加载错文件,最终只能覆盖默认路径下的配置文件解决问题。
马克一个 linux 下的 cli 百度云 python 客户端
https://github.com/houtianze/bypy/blob/master/README.md
pipy国内镜像目前有:
http://pypi.douban.com/ 豆瓣
http://pypi.hustunique.com/ 华中理工大学
http://pypi.sdutlinux.org/ 山东理工大学
http://pypi.mirrors.ustc.edu.cn/ 中国科学技术大学
对于pip这种在线安装的方式来说,很方便,但网络不稳定的话很要命。使用国内镜像相对好一些,
如果想手动指定源,可以在pip后面跟-i 来指定源,比如用豆瓣的源来安装web.py框架:1
pip install web.py -i http://pypi.douban.com/simple
注意后面要有/simple目录!!!
要配制成默认的话,需要创建或修改配置文件(linux的文件在~/.pip/pip.conf,windows在%HOMEPATH%\pip\pip.ini),修改内容为:1
2[global]
index-url = http://pypi.douban.com/simple
这样在使用pip来安装时,会默认调用该镜像。
更多配置参数见:http://www.pip-installer.org/en/latest/configuration.html