# /etc/init.d/mysqld restart Stopping MySQL: [ OK ] Starting MySQL: [ OK ]
4.登录并修改MySQL的root密码
1
2
3
4
5
6
7
8
9
10
11
12
13
14
[root@localhost ~]# mysql Welcome to the MySQL monitor. Commands end with ; or \\g. Your MySQL connection id is 3 Server version: 5.1.71 Source distribution Copyright (c) 2000, 2013, Oracle and/or its affiliates. All rights reserved. Oracle is a registered trademark of Oracle Corporation and/or its affiliates. Other names may be trademarks of their respective owners. Type 'help;' or '\\h' for help. Type '\\c' to clear the current input statement. mysql>UPDATE mysql.user SET Password = password ("new-password") WHERE User = 'root'; Query OK, 3 rows affected (0.00 sec) Rows matched: 3 Changed: 3 Warnings: 0 mysql> exit Bye
5.将MySQL的登录设置修改回来
1
vi /etc/my.cnf
将刚才在[mysqld]的段中加上的skip-grant-tables删除,保存并且退出vi;
6.再次重新启动mysqld
1
2
3
# /etc/init.d/mysqld restart
Stopping MySQL: [ OK ]
Starting MySQL: [ OK ]
functioncount(o){ var t = typeof o; if (t == 'string') { return o.length; } elseif (t == 'object') { var n = 0; for (var i in o) { n++; } return n; } returnfalse; };
Date.prototype.Format = function (fmt) { var o = { "M+": this.getMonth() + 1, "d+": this.getDate(), "h+": this.getHours(), "m+": this.getMinutes(), "s+": this.getSeconds(), "q+": Math.floor((this.getMonth() + 3) / 3), "S": this.getMilliseconds() }; if (/(y+)/.test(fmt)) fmt = fmt.replace(RegExp.$1, (this.getFullYear() + "").substr(4 - RegExp.$1.length)); for (var k in o) if (newRegExp("(" + k + ")").test(fmt)) fmt = fmt.replace(RegExp.$1, (RegExp.$1.length == 1) ? (o[k]) : (("00" + o[k]).substr(("" + o[k]).length))); return fmt; }
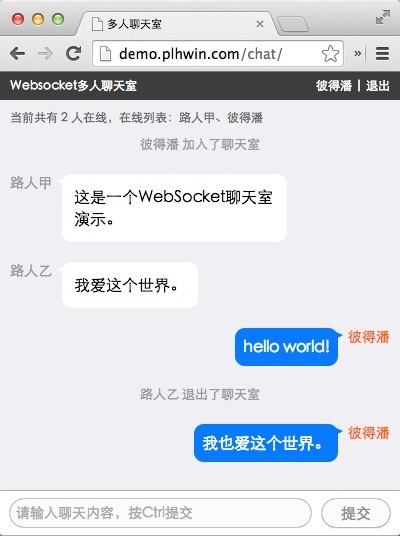
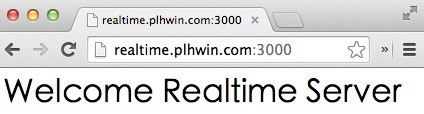
var app = require('express')(); var http = require('http').Server(app); var io = require('socket.io')(http); app.get('/', function(req, res){ res.send('<h1>Welcome Realtime Server</h1>'); }); http.listen(3000, function(){ console.log('listening on *:3000'); });
命令行运行node index.js,如果一切顺利,你应该会看到返回的listening on *:3000字样,这说明服务已经成功搭建了。此时浏览器中打开http://localhost:3000应该可以看到正常的欢迎页面。 如果你想要让服务运行在线上服务器,并且可以通过域名访问的话,可以使用Nginx做代理,在nginx.conf中添加如下配置,然后将域名(比如:realtime.plhwin.com)解析到服务器IP即可。
新入手了个 pi 2B,先上张全家福(好吧图有点大) 那啥,把系统移动到 u 盘里的好处应该不用我说了吧,相信各位也应该百度过了。但是!百度下来的各种教程却是各种麻烦,有用 U-Boot 的,有用 BerryBoot 的,反正就是各种奇奇葩葩的第三方。其实,事情并没有那么复杂:
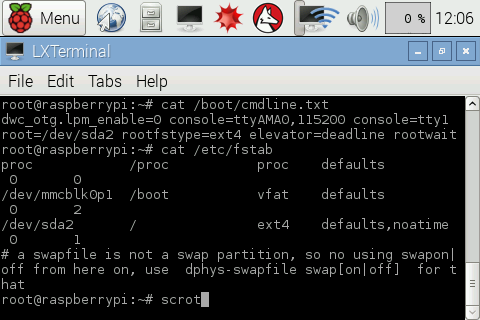
为确保不会发生错误,本文所有语句均在 root 用户下执行**
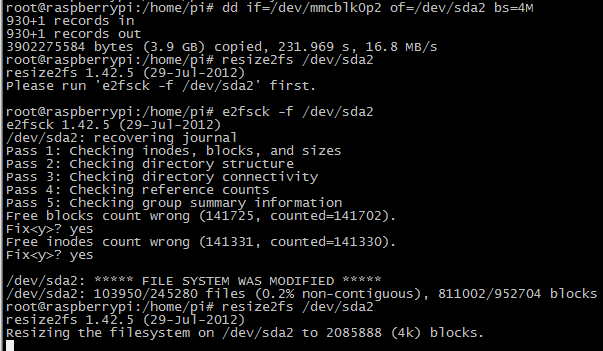
第一步:给 U 盘分区 因为 U 盘比较大,所以不想全部用在树莓派上,当然各位要是土豪可以跳过这一步。 在这里需要注意的是,常用文件分区(FAT32/NTFS/exFAT)一定要分在第一个区,树莓派的 ext3 要分在第二个区,不然傻乎乎的 Windows 会不认识。如图: 分区时可以不用管树莓派分区的文件系统,因为后续操作会覆盖掉。
第二步:将 sd 卡中的系统迁移至 U 盘 很简单,用 dd 就行了。在这里我的 U 盘是 sda,第二个分区:
For example, to install a basic PostgreSQL 9.4 server:
1
yum install postgresql94-server
Other packages can be installed according to your needs.
配置 After installing the packages, a database needs to be initialized and configured. PostgreSQL data directory(/var/lib/pgsql/9.4/data) contains all of the data files for the database.
Initialize The first command (only needed once) is to initialize the database:
1
service postgresql-9.4 initdb
正在初始化数据库: [确定]
Startup 开机启动:
1
2
chkconfig postgresql-9.4 on
service postgresql-9.4 start